Mercenaries
Implementation & Technical Information
Implementation of Raycasting (Line Trace)
Raycasting Example
Code Snippet
Feature Explanation
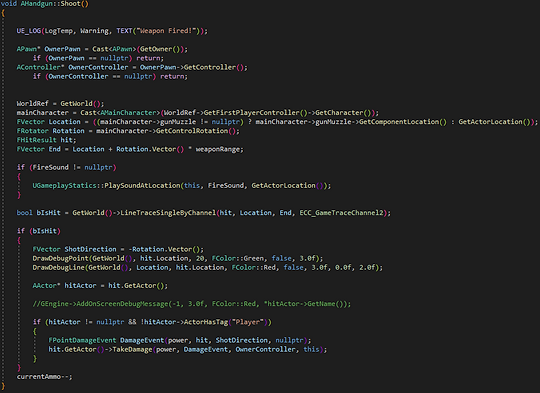
Raycasting is a method used in game to shoot an invisible line into the world to conduct various actions. In this case, it is being used to fire weapons and damage enemies when hit.
At first, a function is created to manage the 'Shooting' of the weapon which contains the implementation of how ray casting is handled.
To start, APawn class is used as a OwnerPawn which is then cast to APawn in which we get the owner. This is then stored in OwnerPawn. As we are needing to get the owners controller, AController* is used which stores the Owning Pawns controller. Each declaration for each class is check to ensure it doesn't equal a nullptr. If the class does equal a nullptr, we simply return to avoid any crashes.
Within the Header file, we have the class UWorld* WorldRef which is used to get a reference to the world. 'mainCharacter' if of type 'AMainCharacter* mainCharacter' so we're able to access the elements of 'AMainCharacter' class. A cast is performed to AMainCharacter in which we get the WorldRef, GetFirstPlayerController, then we GetCharacter. This allows for further use of the AMainCharacter class and allows the functionaility to be cast to our character.
Raycasts need a Start and End point when performing the cast to determine where it has started and finished. However, to do this correctly, we need to find the Location and the Rotation of the cast so it performs correctly.
We start this by creating a new variable 'Location' of type FVector (a 3D vector) and then storing the gun muzzle which is setup in the mainCharacters blueprint. If true, we return the component location of the muzzle, if false, we return the root component of this actor.
'Rotation' is stored in FRotation which is a container for rotation information, Rotation stores the mainCharacter's control rotation.
'hit' stores the hit result of the rasy cast, if anything has been hit which is of type FHitResult.
'End' stores the end point of the raycast by taking the location, rotation by converting it to a vector facing it's direction, then multiplied by the weapons range, this is of type FVector.
To check whether a physical object has been hit (wall, floor, ceiling, enemy, etc.), a boolean variable is created called 'bIsHit' which stores the line trace by getting the hit (what object was hit), location (the start point of the cast), End (the end of the cast), and a custom trace channel which determines which actors should be hit (or which actor/object will result in a successful hit). If bIsHit returns true, a debug line can be seen once a valid object has been hit. If 'hitActor' is not equal to a nullptr and the 'hitActor' has the tag of "player", then no damage is to be dealt. This avoided the player from shooting their own mesh when looking down. A DamageEvent is created to handle the event of an actor taking damage. In this instance, the power, hit result, ShotDirection, and a nullptr. Then we get the actor that was hit and apply damage to that actor by using the TakeDamage function which is apart of the Actor API, and once again, we pass in the weapons power, the DamageEvent being dealt, the owning controller (the player), and this (a pointer to itself).
Enemy Take Damage from Raycast
UI Binding Example
Code Snippet
Feature Explanation
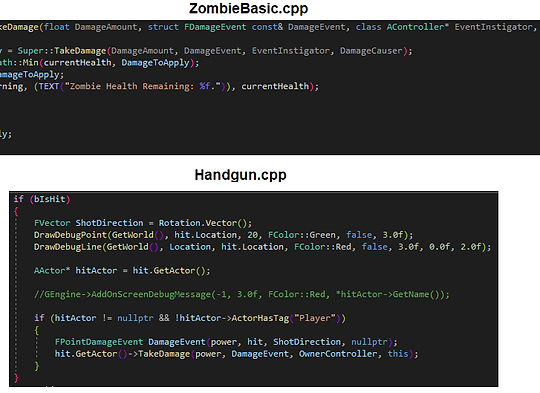
Enemy damage is managed through the successful hit of the Raycast implementation on a Zombie Actor.
'ZombieBasic' has a function within 'AZombieBasic::TakeDamage' which implements the damage if a raycast has successfully hit the actor. A variable is created to store the 'DamageToApply', which equals the 'Super:: (typedef for the base class UObject) TakeDamage'. The TakeDamage function has arugments passed in which are used in 'Handgun.cpp'. 'currentHealth' of the Zombie Actor is then set to equals minus of what the DamageToApply is to deduct the Zombie health by X amount (specified in Handgun.h'. Asimple UE_LOG is used to print that specific actors health to the console to check if damage is being applied. 'Destroy()' destroyed the actor once it's health has reached zero. The function then returns a floating point value of 'DamageToApply'.
'Handgun.cpp' is where the DamageEvent and TakeDamage are implemented and used. If the 'hitActor' is not equal to a nullptr and doesn't have the tag "Player", we can then apply the damage to the actor that was hit. We call 'FPointDamageEvent' and create the 'DamageEvent' function by using the function within FPointDamageEvent. FPointDamageEvent() : Damage(0.0f), ShotDirection(ForceInitToZero), HitInfo(). For this, power, hit, ShotDirection, and a nullptr are passed into the function as created with the Raycast before hand. We then access 'hit', get the actor and call the TakeDamage function and pass in the power (damage to apply to the actor as set in Handgun.h), the DamageEvent (FPointDamageEvent), OwnerController (the player), and this (a pointer to itself as this is the class that caused the damage).
UI Binding
UI Binding Example
Code Snippet
Feature Explanation
The purpose of UI binding is to show the player values such as health, ammo, energy, time left, etc. within their UI/HUD. The above video shows basic gameplay and the features of UI binding within the project.
First of, a Character Controller was created to handle the implementation of UI for the player. This allows for multiple elements to be added to the character controller if needed.
Each part of the UI/HUD is created in the MainCharacterController.h file by first declaring a TSubclassOf<class UUserWidget> which is then given a name for which UI element will be displayed. TSubclassOf is used as it can be passed around with type safety. Example, if a designer was to implement a new UI element into this controller, only UUserWidget classes would show up to avoid incorrect classes trying to be set as a UUserWidget in the blueprint class.
In MainCharacterController.cpp in 'BeginPlay()', a definition and creation is created for each UI element.
UUserWidget* Ammo = CreateWidget(this. AmmoClass), this creates the widget based on which Blueprint classes is passed into it and if the class doesn't equal to a nullptr, add the specificed class to the viewport.
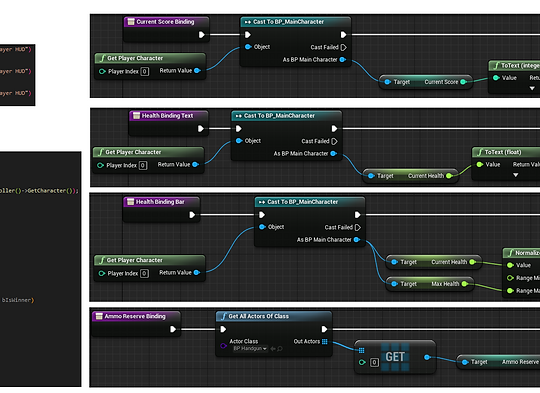
Each UI element has 'variable binding' implemented to show values such as health, points, and ammo. To achieve this, blueprints were used.
A Blueprint function is created to handle that specific bind (i.e; Current Score Binding), this is then cast to the MainCharacter, MainCharacter is then set to the target which allows access to CurrentScore which is converted into text then returned to the Return node to display in the viewport. During the cast, we need to make sure the object we are getting our player character.